Thursday, February 26, 2015

Creating an Allergy-Free Yard


Two of my grandchildren have severe allergies, both food and environmental. Their tests show that pollen and tree nuts are some (of several) environmental culprits, leading to flare-ups when they stay at Nana and Pappy's house. But what can we do apart from keeping them indoors? With this problem in mind, I was thrilled to be given the opportunity to review a new book by Thomas Ogren, The Allergy-Free Garden: Stop Asthma and Allergies With Smart Landscaping. Tom, an eminent horticulturist, whose wife has asthma and allergies, became interested in allergy-free gardening more than 25 years ago. His research, lectures and publications have gained worldwide acclaim. I am ashamed to admit I never considered allergy-free landscaping before now. Tom's book, his fourth on this subject, was an eye-opener for me. I am totally in awe of Tom's important work.

I learned from the book that in the 1950's few people had severe allergies, but today asthma is the #1 chronic disease in children in the U.S. Tom explains how we created the problem -- yes, it is man-made. Originally, landscapers used plants propagated by seed, so there were more-or-less equal numbers of male and female. New discoveries allowed growers to produce separate-sexed plants, so they could choose one or the other. As you know, my dear gardening friends, the male produces pollen, the female produces fruit. As the female plants are the messy ones, the USDA recommended only male trees should be planted in towns and cities to reduce the amount of litter on sidewalks. Therefore, less mess, but 10,000 times more pollen than when both male and female were planted. Making it worse, not only do female plants produce no pollen, they trap and remove pollen from the air. The problem was further exacerbated when the trees lost through Dutch Elm Disease were replaced with male trees.
"Pollen is the invisible litterer"
-- Thomas Ogren
Male trees produce no fruit for birds and small animals to eat, and they produce little or no nectar for butterflies, hummingbirds and bees: probably one of the reasons for the decline in butterflies and bees in our cities. Fortunately, we don't have to be so particular about smaller plants. Low allergy pollinator plants make small amounts of large, sticky, not very allergenic pollen. Mints and other pollen-free female plants are rich sources of nectar. 

Catmint Nepata has low amounts of pollen and high amounts of nectar.

 Tom suggests you evaluate your existing plants. He does a good job of explaining perfect (bisexual) flowers, monoecious (single sexed) and dioecious (unisexual), suggesting ways you can determine the sex of a plant, giving several examples of each. An earlier book of Tom's has the attention-grabbing title, Safe Sex. It's a great title now we know the link between the sex of the plant and its power to cause or prevent allergies.

Snapdragon Antirrhinum. Perfect flower that spreads v. little pollen.

In one section of the book, Tom discusses eliminating allergy-causing mold spores with such considerations as mulches, airflow, and sunlight. He advocates IPM and avoiding insecticides and fungicides ... in my case this is 'preaching to the choir.' As well as advice on home landscaping, Tom shows how we can fight allergies in neighborhoods and cities by writing letters and sending emails. He draws attention to the concern about pollen in our school yards. In addition, he points out that the push to 'plant more trees' has no regard for the allergy problem.
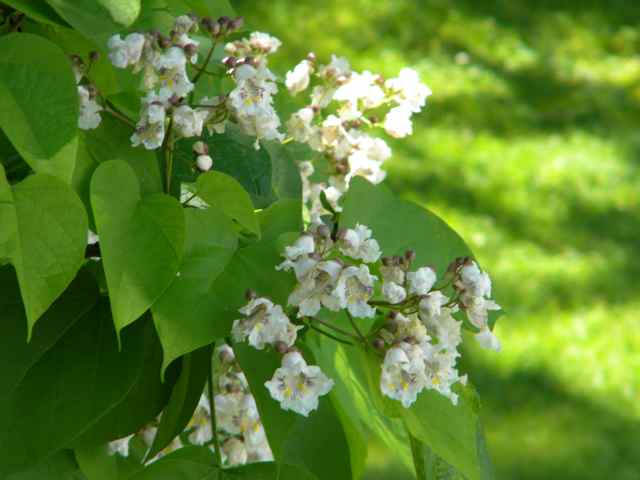
The most important part of the book for me is the A - Z listing of allergy-fighting plants. Tom has developed the Ogren Plant Allergy Scale or OPALS. This is a numerical scale ranking such factors as amount of pollen produced, potency of the pollen, how long in bloom, size of pollen grains, etc. It is a 1 - 10 scale with one being the least allergenic. Each plant is ranked against other plants of the same type (obviously, a tree with a high rank will be worse than a perennial with a high rank, because of size.) The A - Z plant list is very comprehensive with cross-references, so you can find a plant when you only know the common name.  I enjoyed looking up my trees, shrubs, and flowers to see how they rank. My snapdragon pictured above is a 1 on the OPALS scale; catmint is 2.

Catalpa: OPALS 6
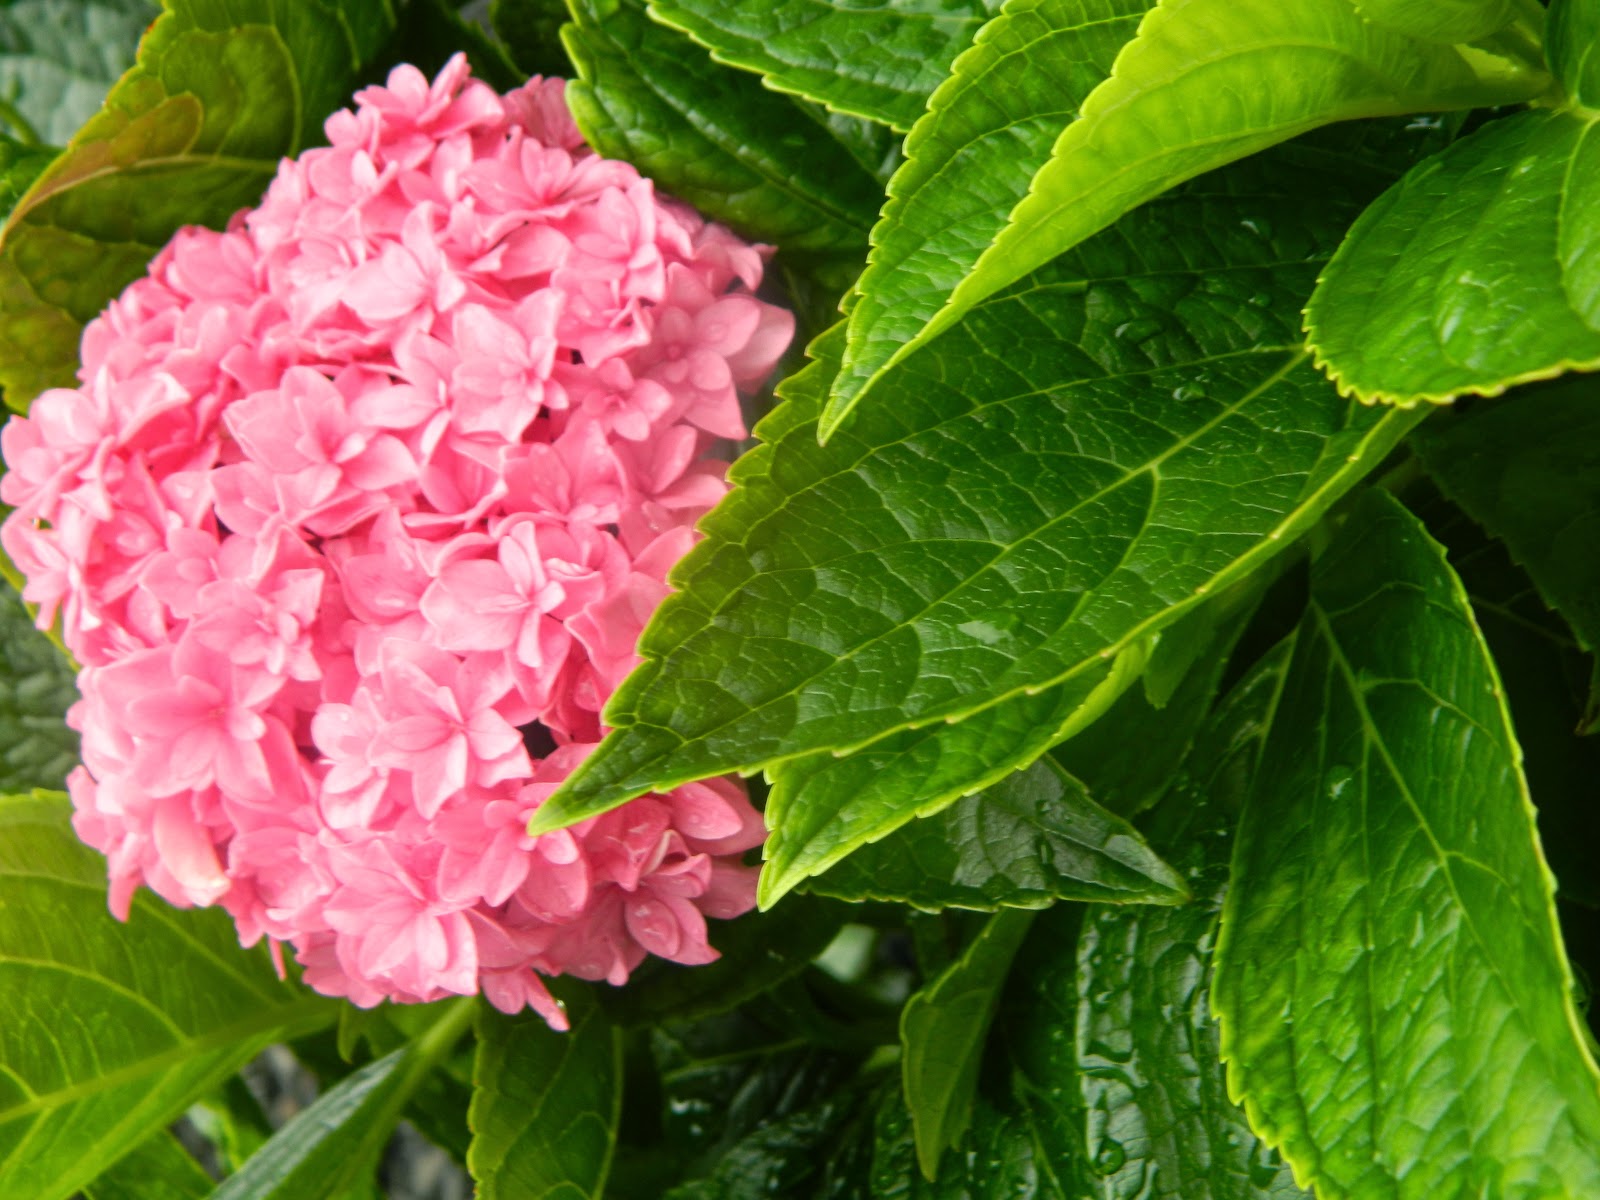
Hydrangea macrophylla: OPALS 3
Hydrangea paniculata 'Pinky Winky': OPALS 5
Deciduous Viburnum: OPALS 3
My many hostas are 1 on the scale
Globe amaranth gomphrena globosa :OPALS 4
Foxglove Digitalis: OPALS 2
Daylily Hemerocallis: OPALS 6
Milkweed Asclepia: OPALS 3

I read that my Juglans, Black Walnut trees, rank high at 8 to 9. As well as pollen, their rotting husk odor triggers allergies. My grandchildren love to play in the walnut grove where we hung a swing from the largest tree. Oh, dear.

Eastern Black Walnut Juglans nigra: OPALS 8 - 9

Each A - Z plant description gives growing conditions and other information as well as its ranking. Finally, the book has an excellent glossary, recommended reading list, list of useful websites, a pollen calendar, and a USDA Plant Hardiness Zone Map.
 
Tom sent me a free iBook in return for an honest review. I have ordered a hard copy from Amazon, because I need to take the book with me for reference when I go to the garden center to make my new plant purchases. Some companies have started using OPALS labels, but many have not. I wont be chopping down all my black walnuts right now, but I don't want to add any more high allergens to my garden. Check out Tom's web page, Allergy-Free Gardening, for more information and for links to purchase the book from your favorite book seller.

As you can see, I found the subject extremely interesting. I'm very grateful that I had the opportunity to review this important book. I highly recommend it. I am linking this posting to Beth at Plant Postings: Lessons Learned. A very important lesson, indeed!

Happy, sneeze-free gardening,

Pamela x

Helleborus ranks 4

~~ I love reading your comments. I hope you leave one so I’ll know you visited! 
I look forward to visiting your blog in return.

Friday, February 20, 2015

Two Great Winter Activities When You Can't Garden


This frigid February is breaking all records for low temperatures! What is a gardener to do? As I write this, the thermometer on the back porch reads -6 degrees Fahrenheit (that is -21 degrees Centigrade for my friends in England -- yes, there is a 'minus' in front of the number.)  Baby, it's cold outside, and I'm not venturing through the door. Again, I ask, what can a frustrated gardener do? Two satisfying indoor activities come to mind: watching backyard birds, and seed starting; both guaranteed to lift the spirits without freezing the fingers.

From my favorite armchair in the garden room, I participated in the Great Backyard Bird Count last weekend. It is fun to go to the website and see the results of the count. Click here to view maps and results by county, state or country.  There were 17595171 total individual birds counted all around the world. In my backyard, the cardinals were the most prolific, with bluebirds close runners up.

3 male cardinals and 1 female (she is bottom left-ish.)
The bluebirds arrive early morning when the light isn't too good for photographs.
Nuthatch fluffed up against the cold.
One of a flock of robins that visited the pond.

I was happy to observe Spunky, the one-legged sparrow, out and about each day of the count.

Spunky, the one-legged sparrow, shelters under the rocking chair on the porch.

The bird count is over, but I am still enjoying the birds.

Now for a real 'gardening' activity: Let's start some seeds; a simple, but effective way to shake off the winter blues. This is a good time to start pansies, as they can be transplanted outside before the last frost date. I purchased heirloom seeds again this year from Annie's. Click here for my reasons. I love the idea that the pansies I chose date back to the 1800's.


Using peat pellets is my favorite way to start seeds. A good reason: I can place the new plant directly into the garden without removing it from the peat medium, meaning less transplant shock, and no damage to delicate roots. Several years ago, I purchased mini 'greenhouses' with trays, covers, and heat pads that I use every planting season. I just have to buy pellet refills each year.

Each tray holds 75 peat pellets

The pellets are thin, flat discs. Gradually add water to cause them to expand. I add approximately 2 1/2 liters of warm water for the entire tray.

Add water to expand the pellets.

Add more water as needed. The pellets are fully expanded when they are about 1 -11/2 inches tall and turn dark brown.

Expanded pellets.

The next step is to gently pull back the netting on top of the pellets and fluff and level the surface peat. I use a small fork.


A fork works well for this stage.

The pellets are now ready for the seeds. Sow 2 - 3 seeds in each, and cover them lightly with the peat.


Cover the tray with the plastic dome and place in a warm location away from direct sunlight.


I set up a seed-starting table in the children's room (my grandchildren don't usually stay here at this time of the school year. When they do come, they are accustomed to finding plants and seeds in odd places in this house.) The room is cold at night, so I place a heating pad under the tray.

When the pellets turn light brown I know it is time to add water, being careful not to over water.

My 'children' are ready to grow in the grandchildren's bedroom.

When the first seeds sprout, I prop open the dome. When all the seeds have sprouted, I remove the dome and place the tray under a grow light. The grow light is on the table ready to go. I'll post an update when the first true leaves appear.

The weatherman forecasts another snow storm coming tomorrow and frigid temperatures to continue next week! I'm so glad the birds still visit despite the weather.

The oh-so-photogenic titmouse.

What are your indoor, winter gardening activities, my friends?

Stay warm and healthy!
Pamela x

Seed-starting Kit

~~ I love reading your comments. I hope you leave one so I’ll know you visited! 
I look forward to visiting your blog in return.

Monday, February 9, 2015

Selecting Seeds for my 2015 Kitchen Garden


Living in the Northern Hemesphere, where winter gardens wear a blanket of snow and ice, I would sink into despondency and dejection without the annual ritual of planning for the new growing season. I traditionally begin by studying the diversity of catalogs appearing in my mailbox as the first snowflakes fall. I am not alone in my love of this pursuit --sitting by the fire, hot chocolate or tea in hand, turning the pages and dreaming. Of course, I have my favorites, choosing from two of them this year: Annie's Heirloom Seeds and Burpee.

Before I list my 2015 choices, I need to take inventory of the seeds I have saved from last year, and the new seeds I won by participating in Debra Prinzing's cyber book party given to celebrate the publication of the 10th anniversary edition of Fran Sorin's book, Digging Deep: Unearthing Creative Gardening. Thank you again, Debra, for this wonderful gift, and thank you, Fran, for a book filled with all that is meaningful about gardening.

Some of the seeds I won.

As you know, those of you who follow my gardening antics, I tend to stick to the same veggies each year, planting what we love to eat and what grows well in my garden, but every year I like to try something new. This year I chose seven exciting new-to-me vegetables from my winnings: eggplant 'Ping Tung,' pepper 'Quadrato D'Asti Giallo,' cabbage 'Red Express,' beet 'Chioggia' (looks like candy cane when sliced,) and three heirloom tomatoes, 'Kellog's Breakfast,' 'Pink Accordion,' and 'Minibel.' As I have not grown them before, I welcome hints from anyone who has had success with any of them, dear gardening friends. SEVEN new ones -- way outside my comfort zone -- I have butterflies in my stomach. So.o.o exciting.

Of course, also I must grow the tried and true: Zucchini 'Black Beauty,' cucumber 'Straight Eight,' and bush bean 'Provider' to name just three. My reliable red beet for pickling is a must-have -- 'Detroit Dark Red.' All my choices are organic.

Old favorites I grow every year.
Red beets are a 'must' grow.

After going on-line and placing my order, the next step is to decide where I am going to grow this bounty. I refer back to my 2014 Kitchen Garden plan. Some years ago, I made a template more-or-less to scale and very easy to fill in. If you compare 2014 and 2015, you will see I rotate my crops to cut down on disease.


Oh, dear,  I don't have enough room for all the new veggies. I solved this problem by ordering a large trug planter to be placed on the patio. H.H. and I have discussed putting a planter nearer the kitchen door for herbs. The past few years, I have planted some herbs in cinder blocks, but the blocks don't provide enough root space for large plants. We decided to buy a trug with enough room for tomatoes and peppers, as well as herbs. The planter is waist height, so no bending required -- perfect gardening for the elderly (that's me.)


I wrote a list on a post-it note of the plants going into the new trug. Then one more step in my planning process. I like to write the planning dates on a calendar and place the seed packets in the order they will be sowed -- oops, I guess that's two steps. I dedicate a calendar to gardening (this year, it's the fun Old Farmer's Almanac, Gardening 2015 Calendar.) I write sowing times, then later add germination times as they occur, first true leaves, etc. I keep this calendar in the potting shed and use it to note when I feed my plants, plus information about pests and weather.

Dates on a calendar; list of plants for the trug on a post-it.

Finally, I file the seeds in a box, organizing them into categories, by seeds I start indoors (veggies, herbs, and flowers,) seeds I directly sow outside before the last frost date, and those I sow outdoors after the last frost date. I use index cards for dividers. I follow the instructions on the seed packet and use the calendar to figure out the sowing dates. For example, the instructions on the tomato packet are Start seed indoors 4-8 weeks prior to the last frost of spring. Here in the Pocono Mountains there is a 50% chance the last frost date will be mid-May, but from experience, I don't plant outside until Labor Day which falls on May 25 this year. Counting back, I need to start my tomato seeds indoors about April 7. I write the sowing date on each seed packet and place them in date order. When all my seeds have arrived, I may add dividers with the sowing dates.

I hope I explained this clearly -- it may sound complicated, but it's really very simple.

My seed box is easy to carry around, indoors and out, as I sow the seeds.

Now just have to wait until the mailman delivers the seeds I ordered.

I ordered annual flowers as well as vegetables. I can't wait for the seeds to arrive because it is time to start pansies indoors. I will get dirt under my nails again very soon!
“It always amazes me to look at the little, wrinkled brown seeds and think of the rainbows in 'em," said Captain Jim. "When I ponder on them seeds I don't find it nowise hard to believe that we've got souls that'll live in other worlds. You couldn't hardly believe there was life in them tiny things, some no bigger than grains of dust, let alone colour and scent, if you hadn't seen the miracle, could you?”  -- L.M. Montgomery, Anne’s House of Dreams.

What seeds have you ordered this year? I am linking this post to Dee's Virtual Gardening Club.  You can join, and tell us about your plans for 2015! 

Happy Gardening,
Pamela x


~~ I love reading your comments. I hope you leave one so I’ll know you visited! 
I look forward to visiting your blog in return.